
Microsoft’s Media Creation Tool for Windows 11 downloads the installation files and creates a bootable USB drive or an ISO file. Get it from Microsoft’s official download page. It creates x64 media for compatible Intel/AMD PCs, not Arm64 media for Snapdragon PCs.
Choose the media-creation section and its download button. If you only want to update the PC you are using, check Windows Update first. Creating a USB and installing Windows are separate actions: making the USB erases that USB drive; a clean installation can erase the destination PC’s files and apps.
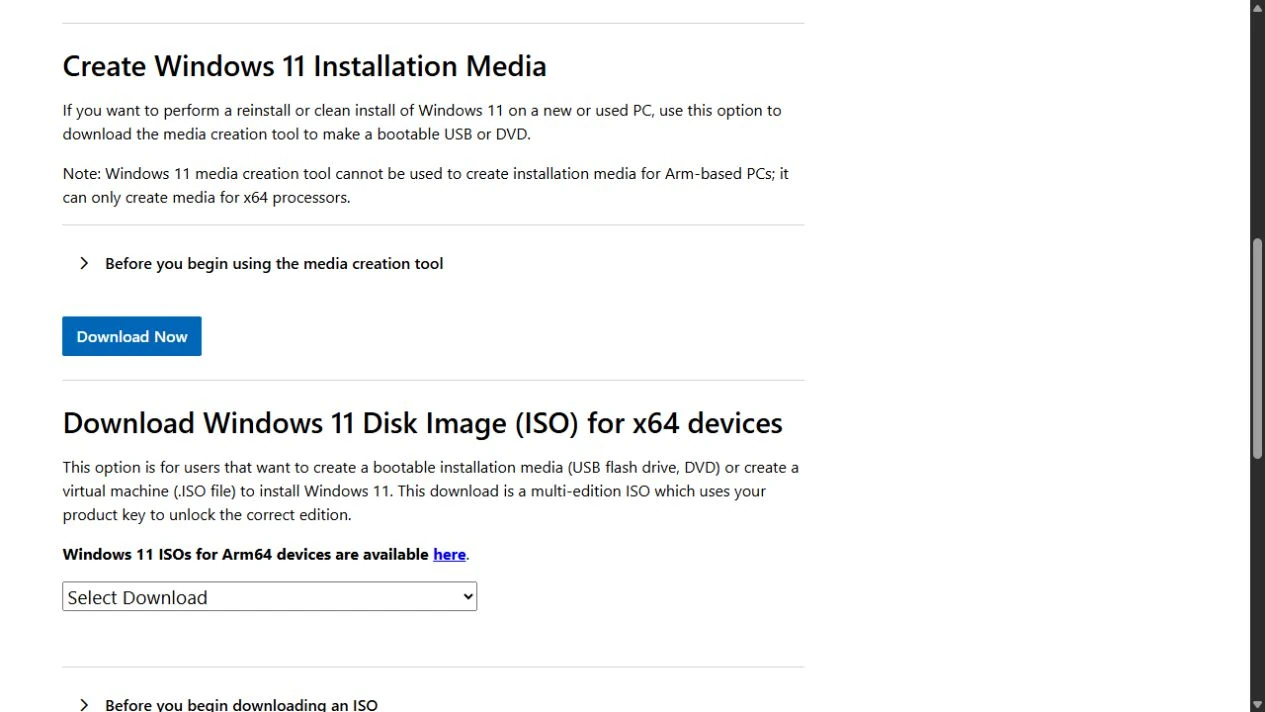
Reviewed on 12 October 2026 against Microsoft documentation. The screenshot below shows the live download page; installation guidance is documentation-based, rather than a claim that a PC was reinstalled for this article.
- Official Windows 11 Media Creation Tool download
- Which Windows 11 download option should you use?
- Check these things before creating the USB
- How to create a Windows 11 bootable USB
- How to create an ISO instead of a USB
- Will using the tool delete my files?
- Does it work on Snapdragon and other Arm PCs?
- Troubleshooting: the next sensible check
- Confirm the result before putting the USB away
- Frequently asked questions
Official Windows 11 Media Creation Tool download
The official page contains several download options. The one you need for making an x64 installer is the section labelled Create Windows 11 Installation Media, rather than Installation Assistant or the ISO selector.
Download MediaCreationTool.exe directly from Microsoft
The direct link above is Microsoft’s own redirect, checked on the review date. Use the main download page if it changes or does not work. There is no need to download the tool from a mirror, install a browser extension or pay a download website.
The tool is free to download, but it does not supply a new Windows licence. Reinstall the edition your device is licensed for. For the practical differences between editions, see our Windows 11 Home vs Pro guide.
Which Windows 11 download option should you use?
Before downloading, decide which processor the destination PC uses and whether you need to keep its installed apps. Those two answers matter more than the USB brand or the computer used to prepare it.
| What you need | Starting point | What to check |
|---|---|---|
| Update a working, eligible PC | Windows Update | Check whether the update is offered and whether known issues affect the device |
| Upgrade the x64 PC you are using | Installation Assistant, if appropriate | Hardware eligibility and Microsoft’s rollout guidance |
| Make a USB installer for another x64 PC | Media Creation Tool | Destination architecture, USB contents and installation plan |
| Save an x64 ISO for installation or a supported VM | Official x64 ISO download or the tool’s ISO option | Language, edition, licence and how the ISO will be used |
| Install on an Arm-based/Snapdragon PC | Official Arm64 ISO or manufacturer recovery route | Model-specific drivers and the vendor’s instructions |
| Repair Windows while keeping apps, where supported | An in-place reinstall started from Windows | Setup must offer the required keep option before you commit |
Microsoft’s installation methods guide explains the upgrade routes. A successful download does not establish that an upgrade is appropriate for your hardware or that an existing compatibility hold has been resolved.
Check these things before creating the USB
- Target architecture: on the PC receiving Windows, open Settings > System > About and check System type. If that PC cannot start, use its manufacturer’s model specifications. Do not assume a Windows laptop is x64.
- Blank USB: Microsoft specifies at least 8 GB. A 16 GB or larger drive is a practical choice; that is a recommendation, not a higher official minimum. Copy anything you need off it first.
- Working Windows PC: use a supported environment, an administrator account, a reliable connection and sufficient local storage for the download process.
- Hardware eligibility: check the target against the Windows 11 system requirements. A compatible CPU, TPM 2.0 and UEFI/Secure Boot capability are among the requirements; a USB installer does not bypass eligibility.
- Backup and recovery access: check that important files can be restored, not merely that a backup job ran. Our backup and recovery guide covers that preparation.
- Encryption recovery key: if BitLocker or Device Encryption is enabled, confirm access to the correct recovery key before changes. Keep it somewhere accessible independently of the PC being worked on. Microsoft’s recovery-key guidance explains where to look.
- Edition, language and drivers: note the installed edition and language, confirm activation, and have the manufacturer’s relevant network/storage drivers available if needed.
For a work or school device, follow the organisation’s deployment process. A consumer installer does not automatically restore management enrolment, security policy or business applications.
How to create a Windows 11 bootable USB
With the checks complete, the media-creation workflow is straightforward:
- Download the executable using the official link above and launch it with administrator permission.
- Read the licence terms and continue only if you accept them.
- Choose the language and Windows edition settings for the destination PC. If the tool offers recommended settings from the preparation PC, check that they fit the destination.
- Choose the USB output option and connect your blank drive.
- Select the correct removable drive. Confirm its label and capacity; unplug unrelated removable drives if that helps avoid a mistake.
- Let the tool download and prepare the installer. Keep the PC powered and the USB connected until it reports completion, then finish and safely eject it.
Microsoft’s media-creation support guide describes the requirements. ASUS also provides a current illustrated USB creation guide showing the workflow; its device-specific reinstall steps are intended for the architectures and models it identifies.
Creating the installer does not install Windows on the preparation PC. You still need to choose how the destination will use it. That is the point to pause if your goal is to keep existing apps or data.
How to create an ISO instead of a USB
Select the ISO output option, choose a save location and let the download finish. An ISO is a disk-image file, not an installed copy of Windows. Keep enough free space for the actual download rather than relying on a fixed file-size estimate from an older guide.
You can also obtain the x64 ISO from the main Microsoft download page. Choose the product and language there, then use the generated download. Microsoft says those generated ISO links expire after 24 hours, so bookmark the official page rather than sharing a temporary file URL.
For a supported installation started within Windows, mount the ISO in File Explorer and run setup.exe. Simply copying an ISO file onto an ordinary USB drive does not create the same bootable installer as the Media Creation Tool’s USB workflow.
Check an ISO’s hash when Microsoft provides one
To calculate a SHA-256 hash without changing the file, use PowerShell:
Get-FileHash -LiteralPath 'C:\Users\YourName\Downloads\Windows11.iso' -Algorithm SHA256Replace the example path with your file’s actual location. Compare the result with Microsoft’s value for that exact download, language and architecture. A hash from a different release or from an untrusted website is not a useful check. Microsoft’s Get-FileHash documentation explains the command.
Will using the tool delete my files?
The key distinction is where you start Windows Setup, rather than whether the installation files came from a USB or ISO.
| Action | What it means for your data |
|---|---|
| Create media on a USB drive | The selected USB’s existing contents are deleted; this alone does not reinstall the PC |
| Start setup.exe while signed in to Windows | A supported in-place path can offer retention of files and apps; check the final selection |
| Boot the PC from installation media for a clean install | Plan for removal of files, apps and settings from the installation destination |
| Delete or format a partition in Setup | Data on that selected partition can be lost; identify the destination before continuing |
If you want to keep apps, stop if Setup does not offer that option. Recheck the installation language, edition, media version and supported upgrade path. Do not proceed on the assumption that the installer will change its mind later.
Before a clean install, verify the backup and follow the Microsoft reinstall instructions. Avoid treating a disk number copied from someone else’s screenshot as proof that it is the correct drive on your PC.
Does it work on Snapdragon and other Arm PCs?
The Windows 11 Media Creation Tool creates x64 installation media. It is not an Arm64 installer builder, even if the target laptop runs Windows 11 and looks similar to an Intel model.
Use Microsoft’s Arm64 download page and Arm installation-media guidance, or the device manufacturer’s recovery method. Bootable Arm media can require model-specific drivers. An x64 app running through emulation does not make an x64 Windows installation image suitable for Arm hardware.
This matters when one PC prepares media for another: check the destination’s architecture, not just the preparation PC. Our Snapdragon vs Intel comparison explains the wider compatibility differences.
Troubleshooting: the next sensible check
The tool will not open or the download fails
Download a fresh copy from Microsoft and note the exact error, where it appears and the Windows version you are running. Check available storage, administrator permissions and connection stability. If downloads are blocked on a managed PC, ask IT to check the policy rather than trying to bypass it.
For an eligible x64 workflow, Microsoft’s direct ISO option is another route to the installation files. It still requires a suitable method for the intended USB, VM or in-place installation.
The USB is missing from the drive list or boot menu
First check whether Windows detects the drive and whether it meets the capacity requirement. Try a direct USB port, refresh the tool’s drive list where available, or use another blank drive. Do not initialise or format an unfamiliar disk just because it appears in a storage-management window.
If media creation completed but the destination does not boot from it, use the manufacturer’s one-time boot-menu instructions. Check the media’s architecture and preparation before changing firmware settings. Do not disable Secure Boot as a routine troubleshooting step.
Setup cannot find the internal drive or network connection
Check the manufacturer’s instructions for the exact model and the required storage or network driver. This is a different problem from downloading the Media Creation Tool. Avoid switching storage-controller modes blindly, because the existing Windows installation may depend on the current configuration.
For installation errors, Microsoft’s upgrade and installation troubleshooting guide provides code-specific steps. Capture the error before restarting repeatedly; there is no single registry edit that safely solves every setup failure.
You want to check whether the executable is signed
An optional read-only check in Windows PowerShell is:
Get-AuthenticodeSignature -LiteralPath 'C:\Users\YourName\Downloads\MediaCreationTool.exe' | Format-List Status,SignerCertificateCheck the actual file path and review the signature status and signer details. An invalid or unexpected result needs investigation; it is not an instruction to disable security checks. Microsoft’s signature-command reference explains the output. A valid signature confirms the signature check, not that your planned installation is risk-free.
If Windows still reaches the sign-in screen, you may be able to investigate a startup problem before reinstalling. Our Windows 11 Safe Mode guide shows the recovery-menu route, password and BitLocker checks, and how to return to normal startup. Installation media and Safe Mode serve different purposes.
Confirm the result before putting the USB away
Keep a short record of the destination model, architecture, edition, language, media creation date and source. For example: “Office laptop; x64; licensed Pro edition; English International; created 12 October 2026 from Microsoft.” This is a suggested record format, not a tested customer deployment.
If you only created media, confirm that the tool completed and label the USB. If you installed Windows, check activation, Windows Update, manufacturer drivers, file access and the applications you actually use. A desktop appearing is not proof that everything needed for work has been restored.
For several business PCs, test the complete workflow on a representative device before wider deployment, including enrolment, encryption and recovery access. Keep the backup until the required checks are complete.
Lets Talk!
If you have additional comments or questions about this article, you can share them in this section.