
To rotate the screen in Windows 11, right-click an empty area of the desktop and select Display settings. Under System > Display, select the monitor you want to change, open Display orientation, and choose Landscape, Portrait or a flipped option. Select Keep changes if the result is correct.
Screen accidentally sideways or upside down? Choose Landscape to return a normally horizontal display to its usual position. If the wrong orientation has just appeared and a confirmation countdown is still running, select Revert or let the countdown expire.
Checked against vendor guidance on 15 October 2026. Screenshots below are genuine Microsoft and ASUS examples; layout and available controls vary by device. Select a screenshot to view it at full size.
- Rotate the screen through Display settings
- Choose the right orientation
- Rotate just one monitor in a multi-screen setup
- Check whether rotation keyboard shortcuts are supported
- Control automatic rotation on a supported tablet or 2-in-1
- Fix a missing control or an unexpected result
- Frequently asked questions
Rotate the screen through Display settings
- Right-click the desktop and select Display settings. Alternatively, press Windows + I, then choose System > Display.
- If more than one screen is connected, select the correct numbered display at the top. Use Identify if you are unsure which one it is.
- Scroll to Scale & layout and open the Display orientation drop-down.
- Choose the orientation you need. Use Portrait for a vertical screen, or Landscape for the usual horizontal layout.
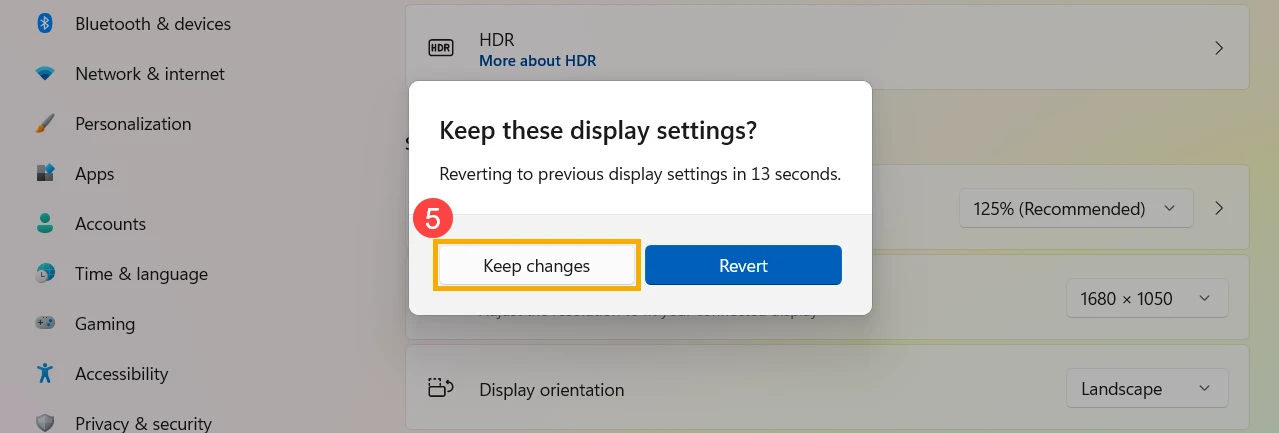
- Check the picture, then select Keep changes if prompted. Choose Revert if it is wrong.
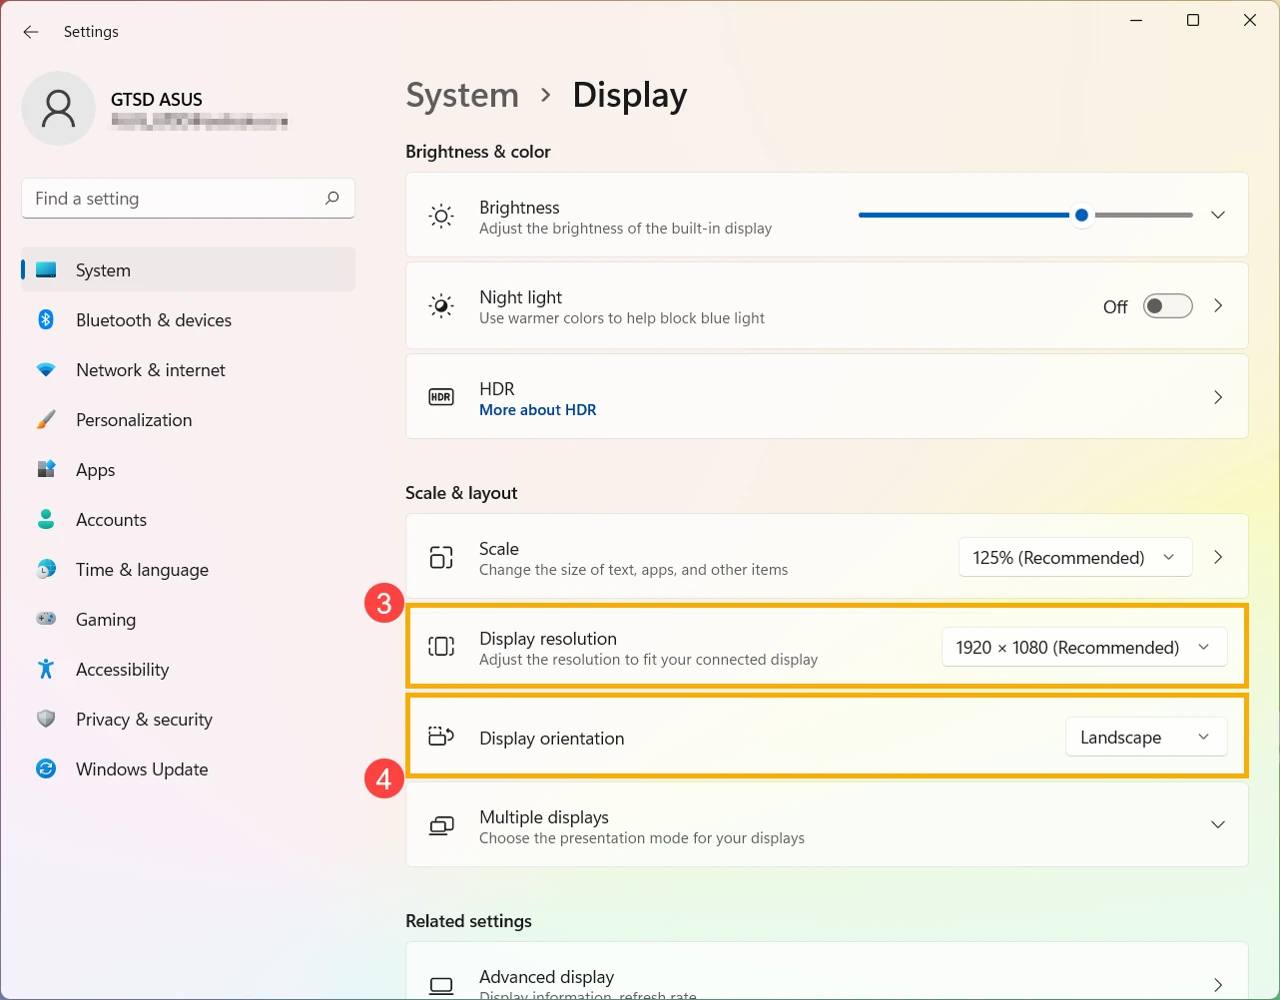
This is the built-in route documented by Microsoft. It does not require a screen-rotation utility. If a display-change confirmation appears, the change is only retained when you confirm it; the dialog shows the remaining time.
Choose the right orientation
| Windows option | Result | Use it for |
|---|---|---|
| Landscape | Horizontal picture | Returning a normally horizontal monitor to its usual position. |
| Portrait | Vertical picture | A monitor physically positioned upright. |
| Landscape (flipped) | Horizontal picture turned upside down | A panel mounted in the opposite horizontal direction. |
| Portrait (flipped) | The other vertical orientation | A portrait panel whose top edge faces the opposite way. |
For a vertical monitor, Portrait and Portrait (flipped) are alternatives: choose the one that makes the text upright with your panel mounted as intended. Avoid relying on “left” or “right” alone when comparing instructions; people can mean the direction of the picture or the direction they turn the hardware.
Changing Windows orientation turns the desktop image. It does not physically move the panel. Check that the stand or mount supports pivoting, allow cable slack and follow the monitor manual before turning an external screen.
Rotate just one monitor in a multi-screen setup
- Open Settings > System > Display and select Identify. Match the number shown on the physical screen to its tile in Settings.
- Select that tile before changing Display orientation. For an independent desktop on each screen, use Windows + P > Extend rather than Duplicate.
- After rotation, drag the display tiles to match the screens’ physical positions. Apply the arrangement if prompted and test moving the pointer between screens.
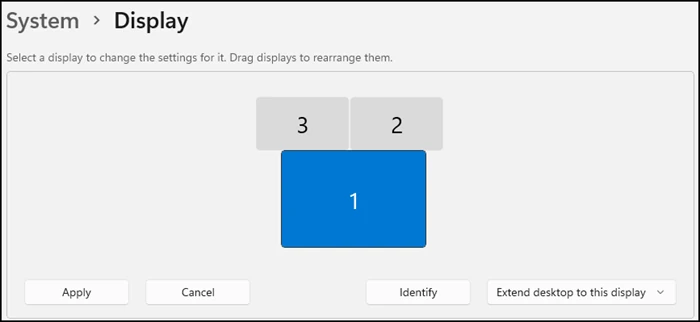
There are two separate adjustments here: orientation turns the selected screen’s picture; arrangement changes where Windows thinks that screen sits beside the others. Microsoft’s multi-monitor guide explains Identify, Extend and arranging the numbered tiles.
If the pointer leaves through the wrong edge, check the tile arrangement before changing orientation again. If it reaches the right screen but text is sideways, check that screen’s orientation. This quick distinction avoids repeatedly undoing a correct rotation.
Check whether rotation keyboard shortcuts are supported
Ctrl + Alt + Arrow is not a dependable shortcut on every Windows 11 PC. Its availability depends on the graphics software and configuration. A shortcut doing nothing does not, by itself, mean Windows or the keyboard is broken.
For Intel systems, Intel documents removing rotation controls and rotation hotkeys from some Graphics Command Center versions. Its article recommends Windows orientation settings as an alternative. Installing the app does not guarantee those controls will appear.
AMD separately documents rotation through supported AMD Software Display Hotkeys. Enable Use Hotkeys and Use Display Hotkeys in its Hotkeys settings if those options are available. AMD lists these mappings:
| AMD display hotkey | Orientation |
|---|---|
| Ctrl + Alt + Up | Landscape |
| Ctrl + Alt + Down | Landscape (flipped) |
| Ctrl + Alt + Left | Portrait |
| Ctrl + Alt + Right | Portrait (flipped) |
AMD specifies that these display hotkeys apply to the main display and do not work during gameplay or with Eyefinity enabled. For an individual secondary monitor, Windows Display settings is the clearer route. You do not need to change your main display just to try the Windows method.
If your PC exposes NVIDIA Control Panel > Display > Rotate display, you can select the screen and orientation there instead. Follow NVIDIA’s rotation instructions; the available pages depend on your system. Windows Display settings remains the first method to try.
Control automatic rotation on a supported tablet or 2-in-1
Automatic rotation reacts when you turn a supported device. It is separate from manually selecting Portrait for an external monitor. A conventional laptop or desktop monitor may have manual orientation controls without an auto-rotation sensor or a Rotation lock switch.
- Put the convertible into its manufacturer-supported tablet posture. Do not look for a universal Windows 11 tablet-mode switch.
- Open Settings > System > Display and look for Rotation lock under Scale & layout.
- Set Rotation lock to Off to allow automatic turning, or On to keep the current orientation fixed.
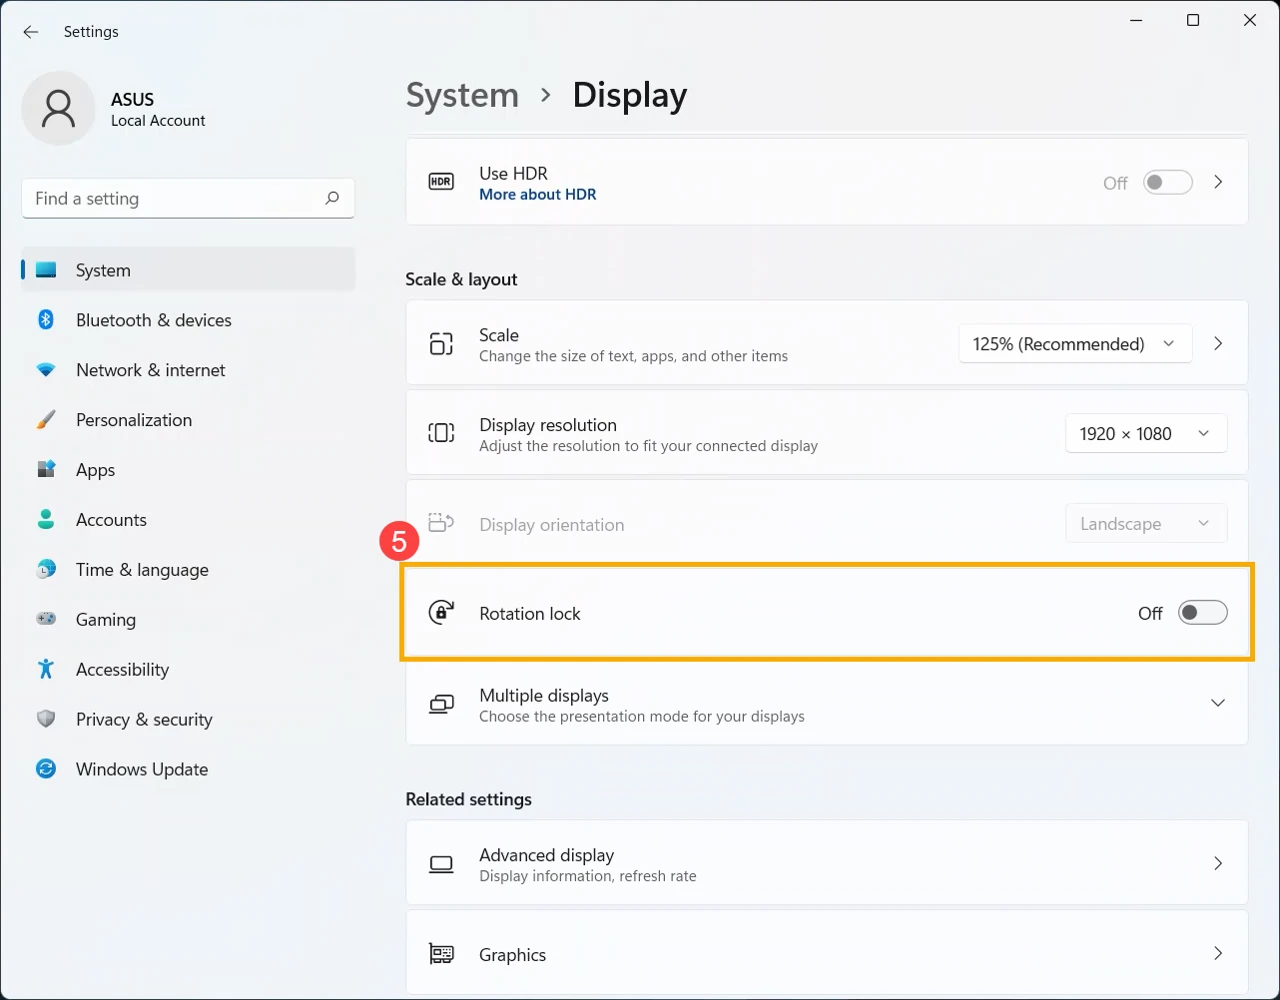
The supported posture and sensor behaviour are model-dependent. ASUS’s convertible troubleshooting guide confirms the Off/On behaviour and tablet-posture requirement for its flip and 2-in-1 models. A missing or greyed-out switch is not automatically a driver fault.
Microsoft also lists Windows + O for locking device orientation in its Windows shortcut reference. It controls orientation locking on compatible hardware; it is not a universal command to rotate any screen by 90 degrees.
Fix a missing control or an unexpected result
| What happens | Next useful check |
|---|---|
| Ctrl + Alt + Arrow does nothing | Use Display settings. Check your graphics vendor’s current shortcut support before installing or replacing anything. |
| The wrong monitor turns | Use Identify, select the intended numbered tile and change its orientation. |
| The screen turns back after a few seconds | Confirm with Keep changes if a countdown is showing. If it changes when you move the device, investigate auto-rotation instead. |
| Rotation lock is missing or greyed out | Check whether this model supports auto-rotation and whether its present keyboard/tablet posture allows it. |
| Display orientation is missing or unavailable | Confirm the selected display and whether you are changing the local PC or a remote/virtual session. Check the PC, dock and display vendor’s guidance for that setup. |
| Text is upright but the pointer crosses the wrong edge | Rearrange the numbered display tiles; the orientation may already be correct. |
| Only one photo, video or app looks sideways | Check that application or file’s rotation control before turning the entire Windows desktop. |
For an external display that is not detected or has a connection problem, start with cables, the selected input and dock compatibility, then use Microsoft’s external-monitor troubleshooting guide. If a problem began after an update, check the device manufacturer’s current graphics and, where applicable, sensor guidance. Do not start by editing the registry, removing drivers or resetting Windows for a simple orientation change.
When asking for help, record which display, which connection and which control is missing. Our Windows screenshot guide explains how to capture the relevant Settings window. Hide account details before sharing it.
If just one photo is sideways, edit that file rather than rotating the whole desktop. Our guide to free photo editing software for Windows 11 covers Microsoft Photos for simple rotation and other editors for more involved changes.
Lets Talk!
If you have additional comments or questions about this article, you can share them in this section.