

To add a shared mailbox to Outlook, first ask your Microsoft 365 administrator to grant you access. Restart Outlook and check whether it appears automatically. If it does not, use the instructions for your version below. Sign in with your own work account; you do not need a shared mailbox password.
Perhaps you have joined the sales team, taken over reception or been asked to cover a colleague’s inbox. Getting the address into Outlook is only part of the job. You also need to check that you can open messages, send from the intended address and leave replies where the rest of the team can find them.
This guide covers existing Microsoft 365 business shared mailboxes in Exchange Online. Personal Outlook.com accounts and mailboxes connected through POP or IMAP do not use this delegated-access setup. If you are still deciding which mailbox type to use, read shared mailbox vs user mailbox.
Guidance checked against Microsoft documentation on 8 November 2026. These are documented procedures, not the results of an end-to-end test in your organisation. Menus can vary by version and rollout. The real Microsoft screenshots below retain their original privacy masking and carry TechVertu watermarking.
- Before you start: check your account and permissions
- Choose the instructions for your Outlook version
- How to add a shared mailbox in new Outlook for Windows
- How to add a shared mailbox in classic Outlook for Windows
- How to add a shared mailbox in Outlook on the web
- How to add a shared mailbox in Outlook for Mac
- Send from the shared address and check team replies
- Shared mailbox not showing or not working? Troubleshoot in this order
- Run a five-point check before using it for customer mail
- Frequently asked questions
- Get your team inbox ready for work
Before you start: check your account and permissions
Have the shared mailbox’s exact email address and the work account that has been given access. If you have two employers’ accounts in Outlook, adding the mailbox under the wrong account will not grant access to it.
Ask IT to confirm the permissions for the task you need to perform:
| Permission | What It Lets You Do | What It Does Not Establish |
|---|---|---|
| Full Access, Also Called Read and Manage | Open the mailbox and work with its contents | Permission to send from its address |
| Send As | Send with the shared mailbox shown as the sender | Permission to open and read the mailbox |
| Send on Behalf | Send with your identity shown on behalf of the mailbox | The same sender presentation as Send As |
These permissions are separate. A mailbox opening successfully does not prove that sending will work. Microsoft explains the distinction in its Exchange Online permissions guidance.
For a team inbox, an administrator typically checks Full Access plus the appropriate sending permission. Access should be approved for named people who need it. Keep the shared mailbox account’s direct sign-in blocked; staff should use their own identities. See Microsoft’s shared mailbox access requirements.
Choose the instructions for your Outlook version
“Outlook 365” can mean several different apps. Start with what you have open:
| Your Version | Where to Start | Where to Look Afterwards |
|---|---|---|
| New Outlook for Windows | Right-click Your Work Account in the Folder Pane | Shared With Me |
| Classic Outlook for Windows | File > Account Settings > Account Settings | The Folder Pane Beside Your Own Mailbox |
| Outlook on the Web | Right-click Folders, or Open Another Mailbox From Your Profile | The Folder List or a Separate Browser Window |
| Outlook for Mac | Tools > Accounts > Delegation and Sharing | The Folder Pane |
If you are unsure, check Microsoft’s version identification guide. Use the section that matches your app, rather than trying every route.
How to add a shared mailbox in new Outlook for Windows
After IT grants access, restart new Outlook. If the mailbox is still absent:
- Open Mail.
- Right-click your work account in the folder pane. Choose Add shared folder or mailbox.
- Enter the shared mailbox address and complete the add prompt.
- Expand Shared with me, then the mailbox and its Inbox.
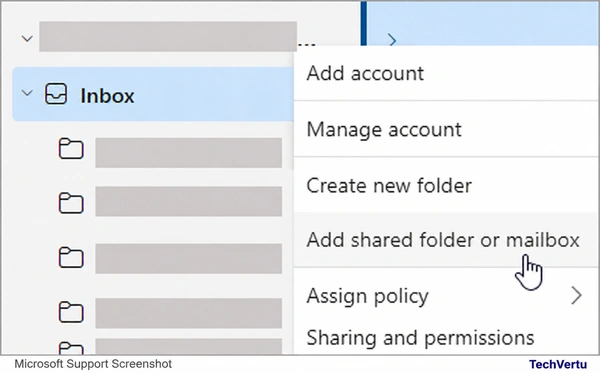
If several accounts are listed, use the one IT authorised. Seeing the mailbox name is not the final check: open an expected message to confirm you can read it. Microsoft’s Windows and web shared mailbox instructions show this folder-based route.
Add it as an account for more mailbox settings
Some versions of new Outlook also let you manage a shared mailbox as an account. This can expose settings such as notifications, categories, rules and automatic replies for that mailbox.
Go to Settings > Accounts > Shared with me. Expand an existing mailbox and choose Convert, or use + Add if it is not already listed. Check Your accounts afterwards. You need Full Access, and Microsoft says the feature may not yet be available in every version. Follow its shared mailbox settings guide.
Here, Convert changes how new Outlook presents the delegated mailbox. It does not convert an Exchange shared mailbox into a user mailbox, and it does not call for a shared password. If the option is unavailable, use the folder route above or Outlook on the web.
How to add a shared mailbox in classic Outlook for Windows
Close and reopen classic Outlook first. If the mailbox has not appeared automatically:
- Select File > Account Settings > Account Settings.
- On Email, highlight your authorised work account and choose Change.
- Open More Settings > Advanced > Add.
- Enter the shared mailbox address. Confirm with OK, then finish and close the account settings windows.
- Restart Outlook if prompted and expand the mailbox in the folder pane.
This route adds the mailbox beneath an existing Exchange account. If your windows differ, stop at the point of difference and check your version or ask IT. The steps are also illustrated by Newcastle University’s IT service.
Do not add the same mailbox repeatedly because it is slow to appear. First check whether it is already in the folder list, perhaps below a collapsed account.
Why a mailbox may not appear automatically
Automatic appearance, often called automapping, is separate from having permission. Microsoft notes that Full Access granted through a security group does not automap the mailbox; explicit user assignments are needed for automapping. A manual add can therefore be appropriate even when access is valid. See the administrator’s automapping explanation.
How to add a shared mailbox in Outlook on the web
Use your organisation’s Outlook web link and sign in with your own work account.
Keep it beside your own mailbox
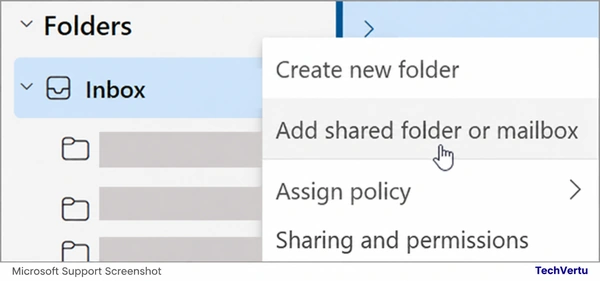
- In the left pane, right-click Folders. Some Exchange layouts use your account name instead.
- Choose Add shared folder or mailbox.
- Enter the shared address and confirm. Expand the mailbox in the folder list.
Open it in a separate window
Select your profile or name, choose Open another mailbox, enter the shared address and select Open. This gives the team inbox its own browser view. Microsoft recommends this route for shared-inbox notifications; browser permissions still affect whether notifications appear. See its web access and notification instructions.
A separate window can also make it easier to keep a busy reception inbox apart from your own correspondence. Check the mailbox identity before replying, particularly when several Outlook windows are open.
How to add a shared mailbox in Outlook for Mac
Microsoft documents this route for shared or delegated mailboxes:
- Choose Tools > Accounts.
- Select the work account that has permission.
- Open Delegation and Sharing > Shared With Me.
- Select +, find the mailbox and add it.
- Expand it in the folder pane and check its Inbox.
An alternative in supported Mac versions is File > Open > Shared Mailbox. Follow Microsoft’s Mac mailbox guide if the labels differ.
Be careful with older tutorials that say Other User’s Folder: opening a single shared calendar is not necessarily the route to opening the whole mailbox. Record your version under Outlook > About Outlook if you need support.
Send from the shared address and check team replies
Adding the inbox and selecting a sender are separate actions. Before sending a new message, make the From field visible and choose the shared address. In classic Outlook, use Options > From; in new Outlook, look for Options > Show From. If necessary, choose Other email address and enter the shared address. Check From on replies too.
Send a harmless test to a colleague who can confirm what arrived. Ask them to inspect the sender, rather than relying only on how your compose window looked. If the intended result is a team identity, check that they see the shared address; an “on behalf of” presentation points to a different permission choice.
Make sent replies visible to the team
Ask a second authorised colleague to look for the test reply in the shared mailbox’s Sent Items. Microsoft documents that sent mail can instead be saved in the sending person’s Sent Items by default. An administrator can configure shared copies under Teams & groups > Shared mailboxes > [mailbox] > Sent items. See Microsoft’s shared Sent Items settings.
This matters at handover. If one colleague answers a customer but nobody else can see the reply, a functioning mailbox can still produce duplicate responses. Agree who handles an enquiry and how cover staff recognise work already in progress.
For messages you intend to send later, see our guide to scheduling emails in Outlook. Test the exact shared sender before relying on it for a deadline.
Shared mailbox not showing or not working? Troubleshoot in this order
Start with Outlook on the web using the same work identity. The result helps narrow the investigation; it does not by itself prove the cause.
| What Happens | What to Check Next | Useful Evidence for IT |
|---|---|---|
| It Opens on the Web but Not in the Desktop App | Correct Account, Collapsed Folders, App Version and Manual Add Route | App Version and the Step That Fails |
| Access Is Denied on the Web Too | Exact Address, Authorised Identity and Full Access Assignment | Error Wording and When Permission Was Granted |
| It Opens but Sending Fails | Send As or Send on Behalf Permission and the Selected From Address | Failure Notice, Sender and Test Time |
| Outlook Asks for a Shared Mailbox Password | Whether It Was Added Through the Wrong Sign-In Route | The Prompt With Sensitive Details Removed |
| It Is Missing After a Group-Based Permission Grant | Whether Access Exists Without Automapping | How IT Assigned the Permission |
| A Reply Is Missing From Shared Sent Items | The Sender’s Sent Items and the Server-Side Copy Settings | Test Subject and Which Folders Were Checked |
| The Address Cannot Be Found | Spelling and Directory Visibility | The Exact Address Supplied by IT |
For a recent permission change, allow time for it to take effect and then restart the app. Avoid promising colleagues that every change will work after a fixed number of minutes. If it still fails, IT should check the assignment and any relevant service issue rather than repeatedly removing and recreating the account.
If Outlook requests authentication, use your authorised work identity where appropriate. Do not reset the shared mailbox password or enable its sign-in to get past the prompt. Ask IT to review how it was added.
Before changing an Outlook profile or deleting local data, preserve unsent work and let your support team check what is stored locally. An access problem rarely justifies starting with a reinstall.
Run a five-point check before using it for customer mail
Use harmless test content and an agreed colleague’s address. Record the outcome of each check:
- Read: Open the shared Inbox and a message you expect to see.
- Receive: Have the colleague send a uniquely titled test to the shared address; find it in the shared Inbox.
- Send: Reply from the shared address and have the colleague confirm receipt and sender presentation.
- Share the Record: Ask another authorised member to find the reply in shared Sent Items.
- Return: Close and reopen your usual app or browser and confirm that you can find the mailbox again.
A visible folder name is not a substitute for these checks. If one fails, include that result in the ticket so IT knows whether to investigate reading, delivery, sending or team visibility. Remove unrelated customer details from any screenshots you provide.
If you are gaining access after someone leaves, follow the separate Microsoft 365 employee offboarding checklist for approval, identity security and retention decisions.
Frequently asked questions
Get your team inbox ready for work
Start with a harmless receive-and-reply test, then check shared Sent Items with another authorised colleague. If access or sending still fails, give IT your Outlook version, error and test result. TechVertu’s Microsoft 365 services can help review the setup and your team’s mailbox support needs.
Lets Talk!
If you have additional comments or questions about this article, you can share them in this section.